Adapting Activities and Increasing
Independence in Inclusive Settings
Using Windows and Microsoft Office
presented
by
Subhashini
Balagopal
Patti
Young
Lou
Dickman
Richmond
Community Schools
Richmond, Indiana
Contents
Windows
Accessibility Features
Form-Filling
Using Imaging for Windows
Creating
Clickable PowerPoint Lessons
Using
Print Screen
Creating
Forms
Creating
Customized Ruled Paper
Keyboard
Shortcuts
Contact Information
WINDOWS ACCESSIBILITY FEATURES
The Windows Accessibility wizard
makes it easier for people with disabilities to operate a computer without
installing special software. Accessibility options—such as StickyKeys,
ShowSounds, and MouseKeys—are designed to help users with specific disabilities
make full use of the computer.

Smartsheet for using Windows Accessibility options
on your computer:
1. Click Start
2. Click Programs
3. Click Accessories
4. Click
Accessibility
5. Click
Accessibility Wizard
6. Follow
instructions to make changes as needed
You can either save the changes you have made for specific users, so they
can log in each time and access the options they have set up OR set the changes
as a default so that the features you have selected will always be on the
screen.
If you DO
NOT see the Accessibility Wizard when you get to step 4, do the following:
1. Click Start
2. Click Settings
3. Click Control
Panel
4. Double-click the
Add/Remove Programs icon
5. Click the Windows
Setup tab
6. Under Components,
place a 3 next to
Accessibility
7. Click OK
When this is complete, close the Control Panel and follow the steps noted
above in the smartsheet section.
(Note: If you do not want your students to have access to these options,
go back to the control panel after you have selected and individualized
accessibility features, and remove the 3 you placed next to Accessibility)
Accessibility
Features:
§
You might want to choose all the Wizard Options (for
persons with visual, auditory, and physical disabilities + administrative
options) to see all the access features available.
§
Change sizes of fonts, titles, menus, scroll bar, window
border size, icons, mouse cursors, etc.
§
Choose to use the Windows magnifier.
§
Change color settings to get high-contrast colors.
§
For persons with hearing impairments, visual warnings and
captions can be viewed instead of system sounds/warnings.
§
Extra keyboard help is provided for persons requiring
mouseless access to the computer.
§
Choose mouse pointer speed, and trails to view cursor
movements clearly on the monitor.
§
Keyboard features:
o
StickyKeys allows you to
press keys in combination one at a time so you don’t have to press two/three
keys simultaneously (e.g. Ctrl+Alt+Del,
Shift+A, etc.)
o
BounceKeys ignores repeated
key strokes made by someone whose hands shake, or who has trouble pressing keys
lightly.
o
ToggleKeys provides a sound
when Caps Lock, Scroll Lock or Num Lock are pressed.
For additional information on Windows accessibility features, go to www.microsoft.com/enable/
At this site you can get further information on accessibility options for
different kinds of disabilities.
If you don’t have the Accessibility
Wizard on your computer:
Click Start-Settings-Control Panel.
Double Click the Accessibility
Options Icon. The Accessibility Properties window will open up with tabs for
keyboard, sound, display, mouse, and general options. Try each of these to
select access features you need.
HIGHLIGHTING TEXT:
F8: Starts Highlighting – use
arrow key to continue highlighting, or press the key again to highlight a word,
sentence, paragraph and entire document
Shift+F8: Undo most recent
highlighting
Esc: Ends highlighting
Check HELP on MSWord to find more keyboard
shortcuts.
FORM-FILLING USING IMAGING FOR WINDOWS
Imaging is available on all
Windows computers. It allows the user to scan a document and mark annotations
in it. I use Imaging as a form-filling program for my students to scan and
complete worksheets independently.
Cheat sheet for using Imaging
- Open Imaging by clicking on Start-Programs-Accessories-Imaging.
- When Imaging opens up, click
 to start a new
scan.
to start a new
scan.
- When the document you have scanned opens up in
Imaging, you can annotate it by clicking on the Annotation Toolbar button.

- This will open up the toolbar with the following
buttons:
 . (appears at bottom of
screen)
. (appears at bottom of
screen)
- Use these buttons to add information to your
scanned document. You cannot edit the information that was scanned.
Annotation toolbar buttons:
 Use this button to select, delete, and move
annotation marks you have placed on your scanned document.
Use this button to select, delete, and move
annotation marks you have placed on your scanned document.
 Use this button to draw freehand lines on your
scanned document. (My students use it in their worksheets for circling words,
or numbers as requested.) If you right click on this button, you can change the
color and width of the lines.
Use this button to draw freehand lines on your
scanned document. (My students use it in their worksheets for circling words,
or numbers as requested.) If you right click on this button, you can change the
color and width of the lines.
 Use this highlighter button to transparently
highlight sections on the document. (Students can use this to highlight answers
for multiple-choice questions.) Right clicking this button will allow you to
change the highlighting color.
Use this highlighter button to transparently
highlight sections on the document. (Students can use this to highlight answers
for multiple-choice questions.) Right clicking this button will allow you to
change the highlighting color.
 Use this to draw straight lines. Right clicking the
button will allow you to change the color and width of the line.
Use this to draw straight lines. Right clicking the
button will allow you to change the color and width of the line.
 Use this button to draw a hollow box. Right clicking the button
will allow you to change the width, color and transparency of the line.
Use this button to draw a hollow box. Right clicking the button
will allow you to change the width, color and transparency of the line.
 Use this button to draw a solid box. Right clicking
the button will allow you to change the color of the box.
Use this button to draw a solid box. Right clicking
the button will allow you to change the color of the box.
 Use this button to type text on your scanned
document. Right clicking the button will allow you to change the text font,
color and font size.
Use this button to type text on your scanned
document. Right clicking the button will allow you to change the text font,
color and font size.
 This will paste a sticky note on the page. Right
clicking the button will allow you to change the font and note color.
This will paste a sticky note on the page. Right
clicking the button will allow you to change the font and note color.
 Use this to place text from a file on to the scanned document. I
have only been able to use .txt files. I was unable to use this with .doc
files.
Use this to place text from a file on to the scanned document. I
have only been able to use .txt files. I was unable to use this with .doc
files.
 Use this rubber stamp button to place a stamp on the page. You
can use a stamp from the list, or create your own stamp by right clicking the
button. I set this up with my students’ names and set up a date button as well,
so that they can stamp their name and date on every worksheet they use.
Use this rubber stamp button to place a stamp on the page. You
can use a stamp from the list, or create your own stamp by right clicking the
button. I set this up with my students’ names and set up a date button as well,
so that they can stamp their name and date on every worksheet they use.
To
create a new stamp:
§
Right click the
rubberstamp button
§
Click on Properties
§
Click the Create Text button
§
In the Stamp Name box give your stamp a name (e.g. ‘My
name’)
§
In the Stamp Text box, type the student’s name (e.g.
‘John Doe’)
§
Click on the Date or Time buttons
if you want them added to your stamp. (I prefer to have a separate date stamp.)
§
Click on the Font button to change the font type, size or
color.
§
Click OK when you’ve finished creating your stamp. It is
now added to the list.
Use the zooming buttons  to enlarge or resize
your view of the document on the monitor. When you print it, it will print out
in the size of the original document you scanned in.
to enlarge or resize
your view of the document on the monitor. When you print it, it will print out
in the size of the original document you scanned in.
To rotate the image, use the rotating buttons  .
.
I usually ask my students to use a text color other
than black so that the teacher can differentiate between what was already on
the worksheet and what has been added to it. Some of my students prefer to use
fonts like Lucida Handwriting because their classmates are writing in cursive.
I have a student who has cerebral palsy, who is using Imaging to do his math on
the computer instead of dictating to an adult helper.
CREATING
FORMS
Creating form
fields in documents: You can use this to set up templates for letters/reports/multiple
choice quizzes, etc. so that a user can tab through the fields and make
changes/additions.
In MS Word, Click
View-Toolbars and check the Forms toolbar to select it. This will place the
Forms toolbar on your desktop.
It will look like
this: 
 Text Form field: To
add text within the document.
Text Form field: To
add text within the document.
 Check box form field:
Users can tab through and press the Enter key to insert a check mark.
Check box form field:
Users can tab through and press the Enter key to insert a check mark.
 Drop-Down form field:
To specify choices for the user to select.
Drop-Down form field:
To specify choices for the user to select.
 Form Field Shading:
When this is selected, it shades text fields so that you can see them. The
shading does not print out.
Form Field Shading:
When this is selected, it shades text fields so that you can see them. The
shading does not print out.
 Protect Form: When you
have finished setting up your form, click this button to lock the form. It will
prevent the user from changing your form/template.
Protect Form: When you
have finished setting up your form, click this button to lock the form. It will
prevent the user from changing your form/template.
USING PRINT SCREEN

- When the image you want to acquire is
on your computer monitor, press the Print Screen key (Print Scrn).
- Open Paint (Click
Start-Programs-Accessories-Paint)
- Paste the image into Paint (Click
Edit-Paste, or Press Control+V)
- Use the
 select or
  free-form select
buttons to draw a box around the image you need, or just draw a free-form
line around the image.
free-form select
buttons to draw a box around the image you need, or just draw a free-form
line around the image.
- Copy the image selected in 4 (Click
Edit-Copy, or Press Control+C)
- Open the document you want to place
the image into, and then paste the copied image (Click Edit-Paste, or
Press Control+V).
This is how the
buttons above were pasted into the document. Use Print Screen to make simple
instructions for students in using some software programs where they need to
remember steps. You can also use this to import pictures into picture
communication books.
CREATING
CUSTOMIZED RULED PAPER
For simple ruled paper:
- Open Microsoft Word
- Click View-Toolbars and select Standard
and Formatting
- Click the Justify button
 or
press Control+J
or
press Control+J
- Select a font size based on the size of spacing
between the lines. Draw one line using the _ underscore key.
- Highlight this line, and copy and paste it for
the rest of the page.
For ruled paper with bold lines
or colored lines:
- Open Microsoft Word
- Click View-Print Layout to view the entire page
- Click View-Toolbars and select Tables and
Borders.
- Click the Draw Table button
 then
click on one corner of your page and draw a single box across the length
of your page. (See below)
then
click on one corner of your page and draw a single box across the length
of your page. (See below)
- Now select a font size based on the size of
spacing you need.
- Press the Tab key on your keyboard to fill the
page with boxes. (See below)
- Highlight all the rows then click the arrow
beside the Outside border button
 on
your Tables and Borders toolbar. You will see a box that looks like this
on
your Tables and Borders toolbar. You will see a box that looks like this 
- Click the Left Border
 and
the Right Border
and
the Right Border  buttons
to erase the outside lines. (See below)
buttons
to erase the outside lines. (See below)
- If you want to make the two middle lines bold,
click the arrow beside the Line Style button
 and
the arrow beside the Line Weight button
and
the arrow beside the Line Weight button  to
select the type of line and the thickness you want. Your cursor will turn
into a pencil. Now click the lines you want to change. (See below)
to
select the type of line and the thickness you want. Your cursor will turn
into a pencil. Now click the lines you want to change. (See below)
- To
change the color of the lines, click the Border Color button
 and
pick a color. Your cursor will turn into a pencil. Click the lines you
want to change to the color you have selected.
and
pick a color. Your cursor will turn into a pencil. Click the lines you
want to change to the color you have selected.
- When
you’re done, click the Draw Table button to
change the pencil back to a regular cursor.
Use the different options to
experiment with a variety of ruled lines. Have fun!
(Note: If you typically draw
tables using the Insert Table button  go right
ahead and use it. J)
go right
ahead and use it. J)
TIP:
To set up a page for legal size
or other paper, click File-Page Setup-Paper Size tab, then select the size of
paper you want to use.
AN ASSIGNMENT FOR FUN!
Try drawing the table shown below
with the Draw Table button , the Line Style , and Line Weight buttons. Use the
Shading Color button  to color
some of the cells gray.
to color
some of the cells gray.
WOW!
YOU DID IT!
Now use the Eraser button  to erase
some of the lines! Have fun!
to erase
some of the lines! Have fun!
CREATING
CLICKABLE POWERPOINT LESSONS
(Based on ideas
developed by Vicki Hershman, PATINS, Indianapolis,
IN)
For
Cause and Effect Lessons:
- Open PowerPoint
- Click Blank
Presentation then click OK
- Select blank
presentation layout then click OK
- Click on the first
slide in the top left hand side of the screen to select it. Click
Edit+Copy or Control+C, then Edit-Paste or Control+V to paste as many
slides as you need for your activity.
- Click Format -
Background. In the Background window, click the little arrow
 to select a background color for your slides.
Click Apply to All.
to select a background color for your slides.
Click Apply to All.
- Click on Slide 1
on the top left hand side of the monitor.
- To insert pictures:
·
Click Insert
– Picture - Clip Art/From File.
·
Find your
picture and insert it to each slide.
·
Click on the
handles (squares that appear on the corners and sides of the picture when you
select it) of each picture to change its size.
·
Click in the
middle of the picture to drag it and reposition
it on the slide.
- Click on Slide 2,
etc. and insert pictures.
- Click Slide Show
- Slide Transition. Click the arrow to select a transition effect
and transition sound. Click Apply to All.
- Click Slide Show
– Set Up Show. Click Loop
continuously until ‘Esc’ for Show Type, and make sure All is
selected in the Slides box.
- Click Slide 1 and
insert a title, by clicking Insert – Picture – Word Art. Select a
style, type a title and click OK.
- Click File – Save As, type a title and click Save.
- Click View – Slide Show to view your lesson.
For Picture
Identification Activities:
- Open PowerPoint
- Click Blank
Presentation then click OK
- Select blank
presentation layout then click OK
- Click on the first
slide in the top left hand side of the screen to select it. Click
Edit+Copy or Control+C, then Edit-Paste or Control+V to paste as many
slides as you need for your activity.
- Click Format -
Background. In the Background window, click the little arrow to select a background color for your slides.
Click Apply to All.
- Click on Slide 1
on the top left hand side of the monitor.
- To insert pictures:
·
Click Insert
– Picture - Clip Art/From File.
·
Find your
picture and insert it to each slide.
·
Click on the
handles (squares that appear on the corners and sides of the picture when you
select it) of each picture to change its size.
·
Click in the
middle of the picture to drag it and reposition it on the slide.
- Click on Slide 2,
etc. and insert pictures as planned for your lesson.
- For each graphic
that is the correct response, do the following:
a)
Click Slide
Show – Action Button. Then click the Forward/Next button  .
.
b)
Place the + at
the top left corner of the picture, and click and drag over the picture to draw
a button over it.
c)
Right-click the
forward button then click Action Settings. Select Hyperlink
to Next Slide. If you want to add a sound, when the slide transitions,
select Play Sound and choose a sound you want to hear by using the
down-arrow. To insert a recorded sound, scroll down to Other Sound and
then find your sound file.
d)
Double-click
the button. In the Format Auto Shape window, change Fill Color to No Fill and
change Line Color to No Line to hide the button from view. (Double-click this
area again if you want to view the Fill Color options again.)
e)
Follow step (a)
to add a Sound button  . Continue with the other steps up to (d). To hide the Sound button, click and drag it
to the gray area of the screen
. Continue with the other steps up to (d). To hide the Sound button, click and drag it
to the gray area of the screen
10. For each
graphic that is the incorrect response, do the following:
a) repeat steps 9(a) and 9(b) above.
b) Right-click
the forward button then click Action
Settings. Select Hyperlink to Slide... Select the number of the slide that is open
(if you are working on Slide 7, select Slide 7). This allows the curser to appear as an open
hand for both selections and won’t cue the student as to the correct
choice. Continue with 9(d) and (e)
above.
- Click Slide Show
- Slide Transition. Set the window to look like this:
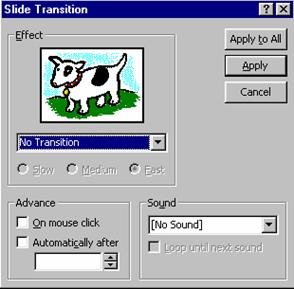
Set the Automatically after box if you wish
to set a time limit for viewing the slide. Click Apply to All.
- Click Slide 1 and
insert a title, by clicking Insert – Picture – Word Art. Select a
style, type a title and click OK. Do the same for the last slide if you
want to end it with credits or an ending title.
- Click File – Save As, type a title and click Save.
- Click View –
Slide Show to view your lesson.
Note:
You
can record sounds with a microphone and add them to your slideshow by doing the
following:
- Click Start – Programs – Accessories –
Entertainment – Sound Recorder. Click Record to start recording
the sound, then click Stop when you’re done. Click Play to
preview the sound. Click File – Save and give your sound a name.
Your
PowerPoint activities are only limited by your imagination.
Go ahead and play today!